Secure your Node
The Node can run privately, but if you expose its APIs online, secure them with SSL and Basic Authentication. See Setup SSL and Basic Auth for more details.
Install a Node
The Auroral platform uses a client software known as the Auroral Node to integrate IoT Infrastructures. It serves as a gateway for sending and recieving data/metadata in your infrastructure.
Software requirements
- Docker with docker-compose
Download - WSL2 (Windows users)
Ubuntu WSL download or
Debian WSL download
Install using CLI
If you only have CLI access to host machine you can install Node by running node_cli.sh script that comes with the Node's directory when you clone/download it from the Auroral Node's repository.
Additional requirements:
- Git (optional)
Download
Tip: Using Git
Using Git to clone Auroral Node's repository is recomended approach. It will let you easly update Node to the latest version by simply running git pull to get the latest updates from the repository.
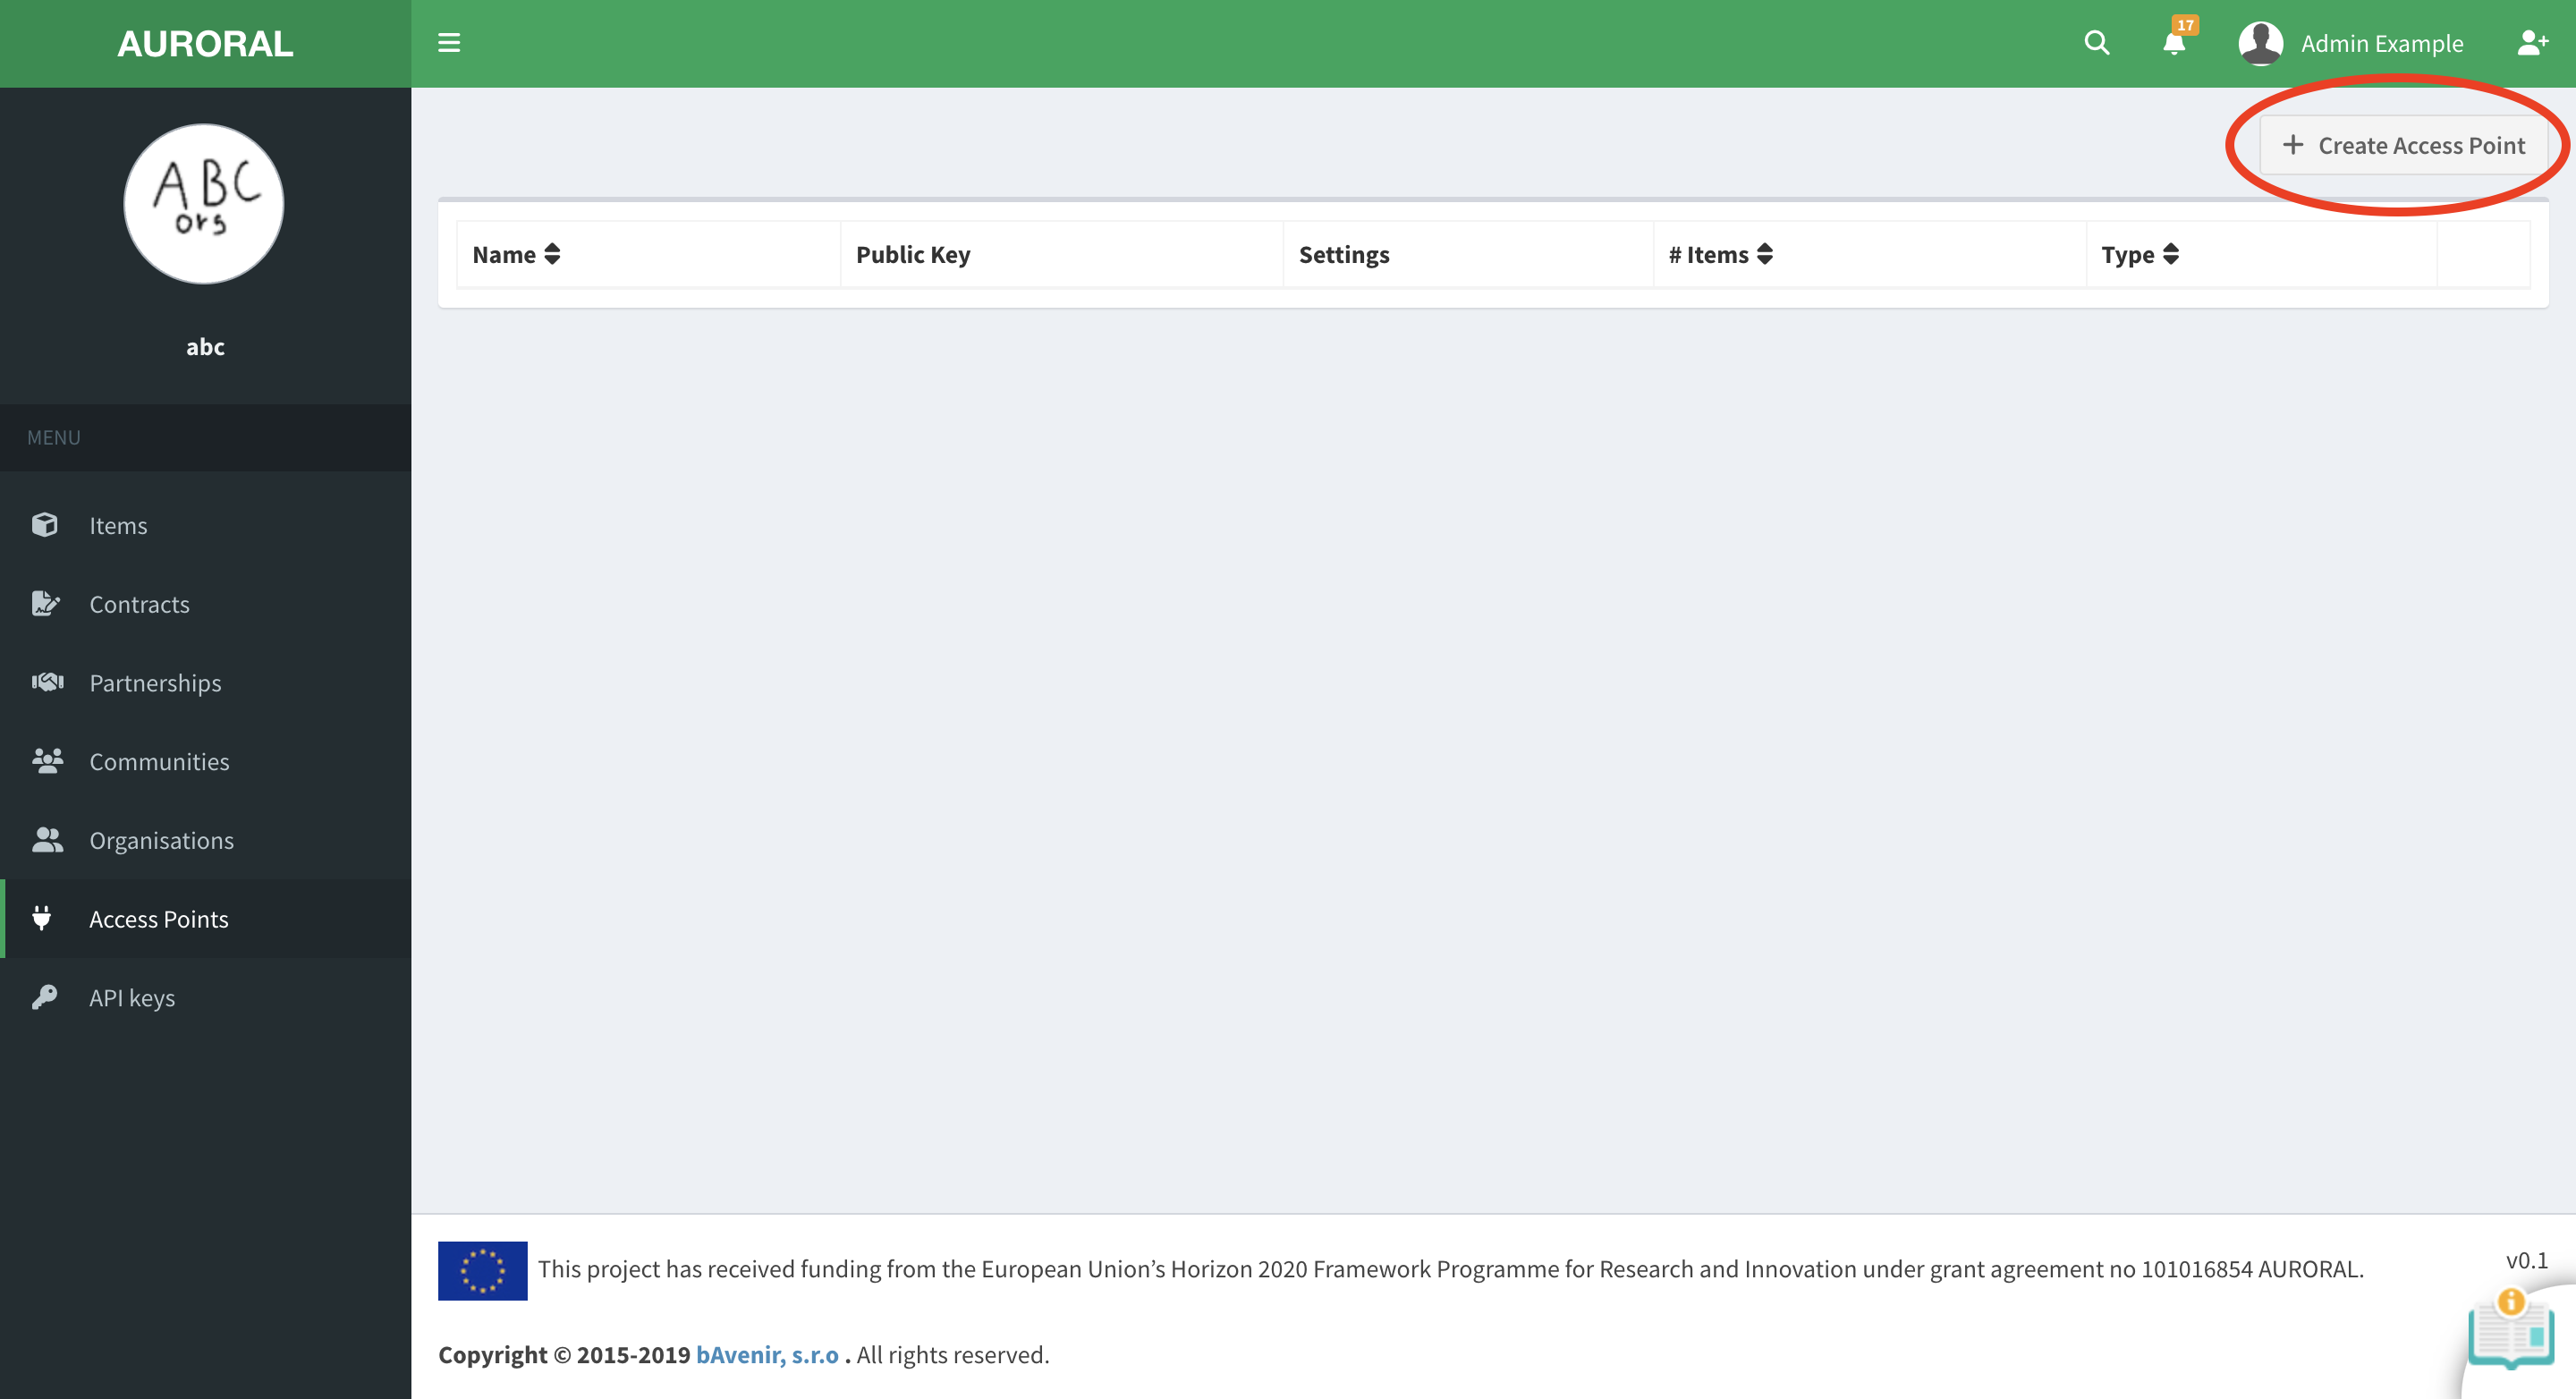
Create an Access Point
First you will need to generate the Access Point to identify your Node in the Platform and to secure your communication with the Auroral Neighbourhood Manager. To generate the Access Point please:
- login to your account
- open Access Point page
- click on
+ Create Access Pointin top right corner:
Don't have an account?
To generate the Access Point you will need organisation accout with a System integrator role. If you do not have the account, please reffer to Setup the account section.
Before you create Access Point, you will be promped to provide some information:
- type the
nameof your new Acces Point - select
Auroralas atype - create a
password:
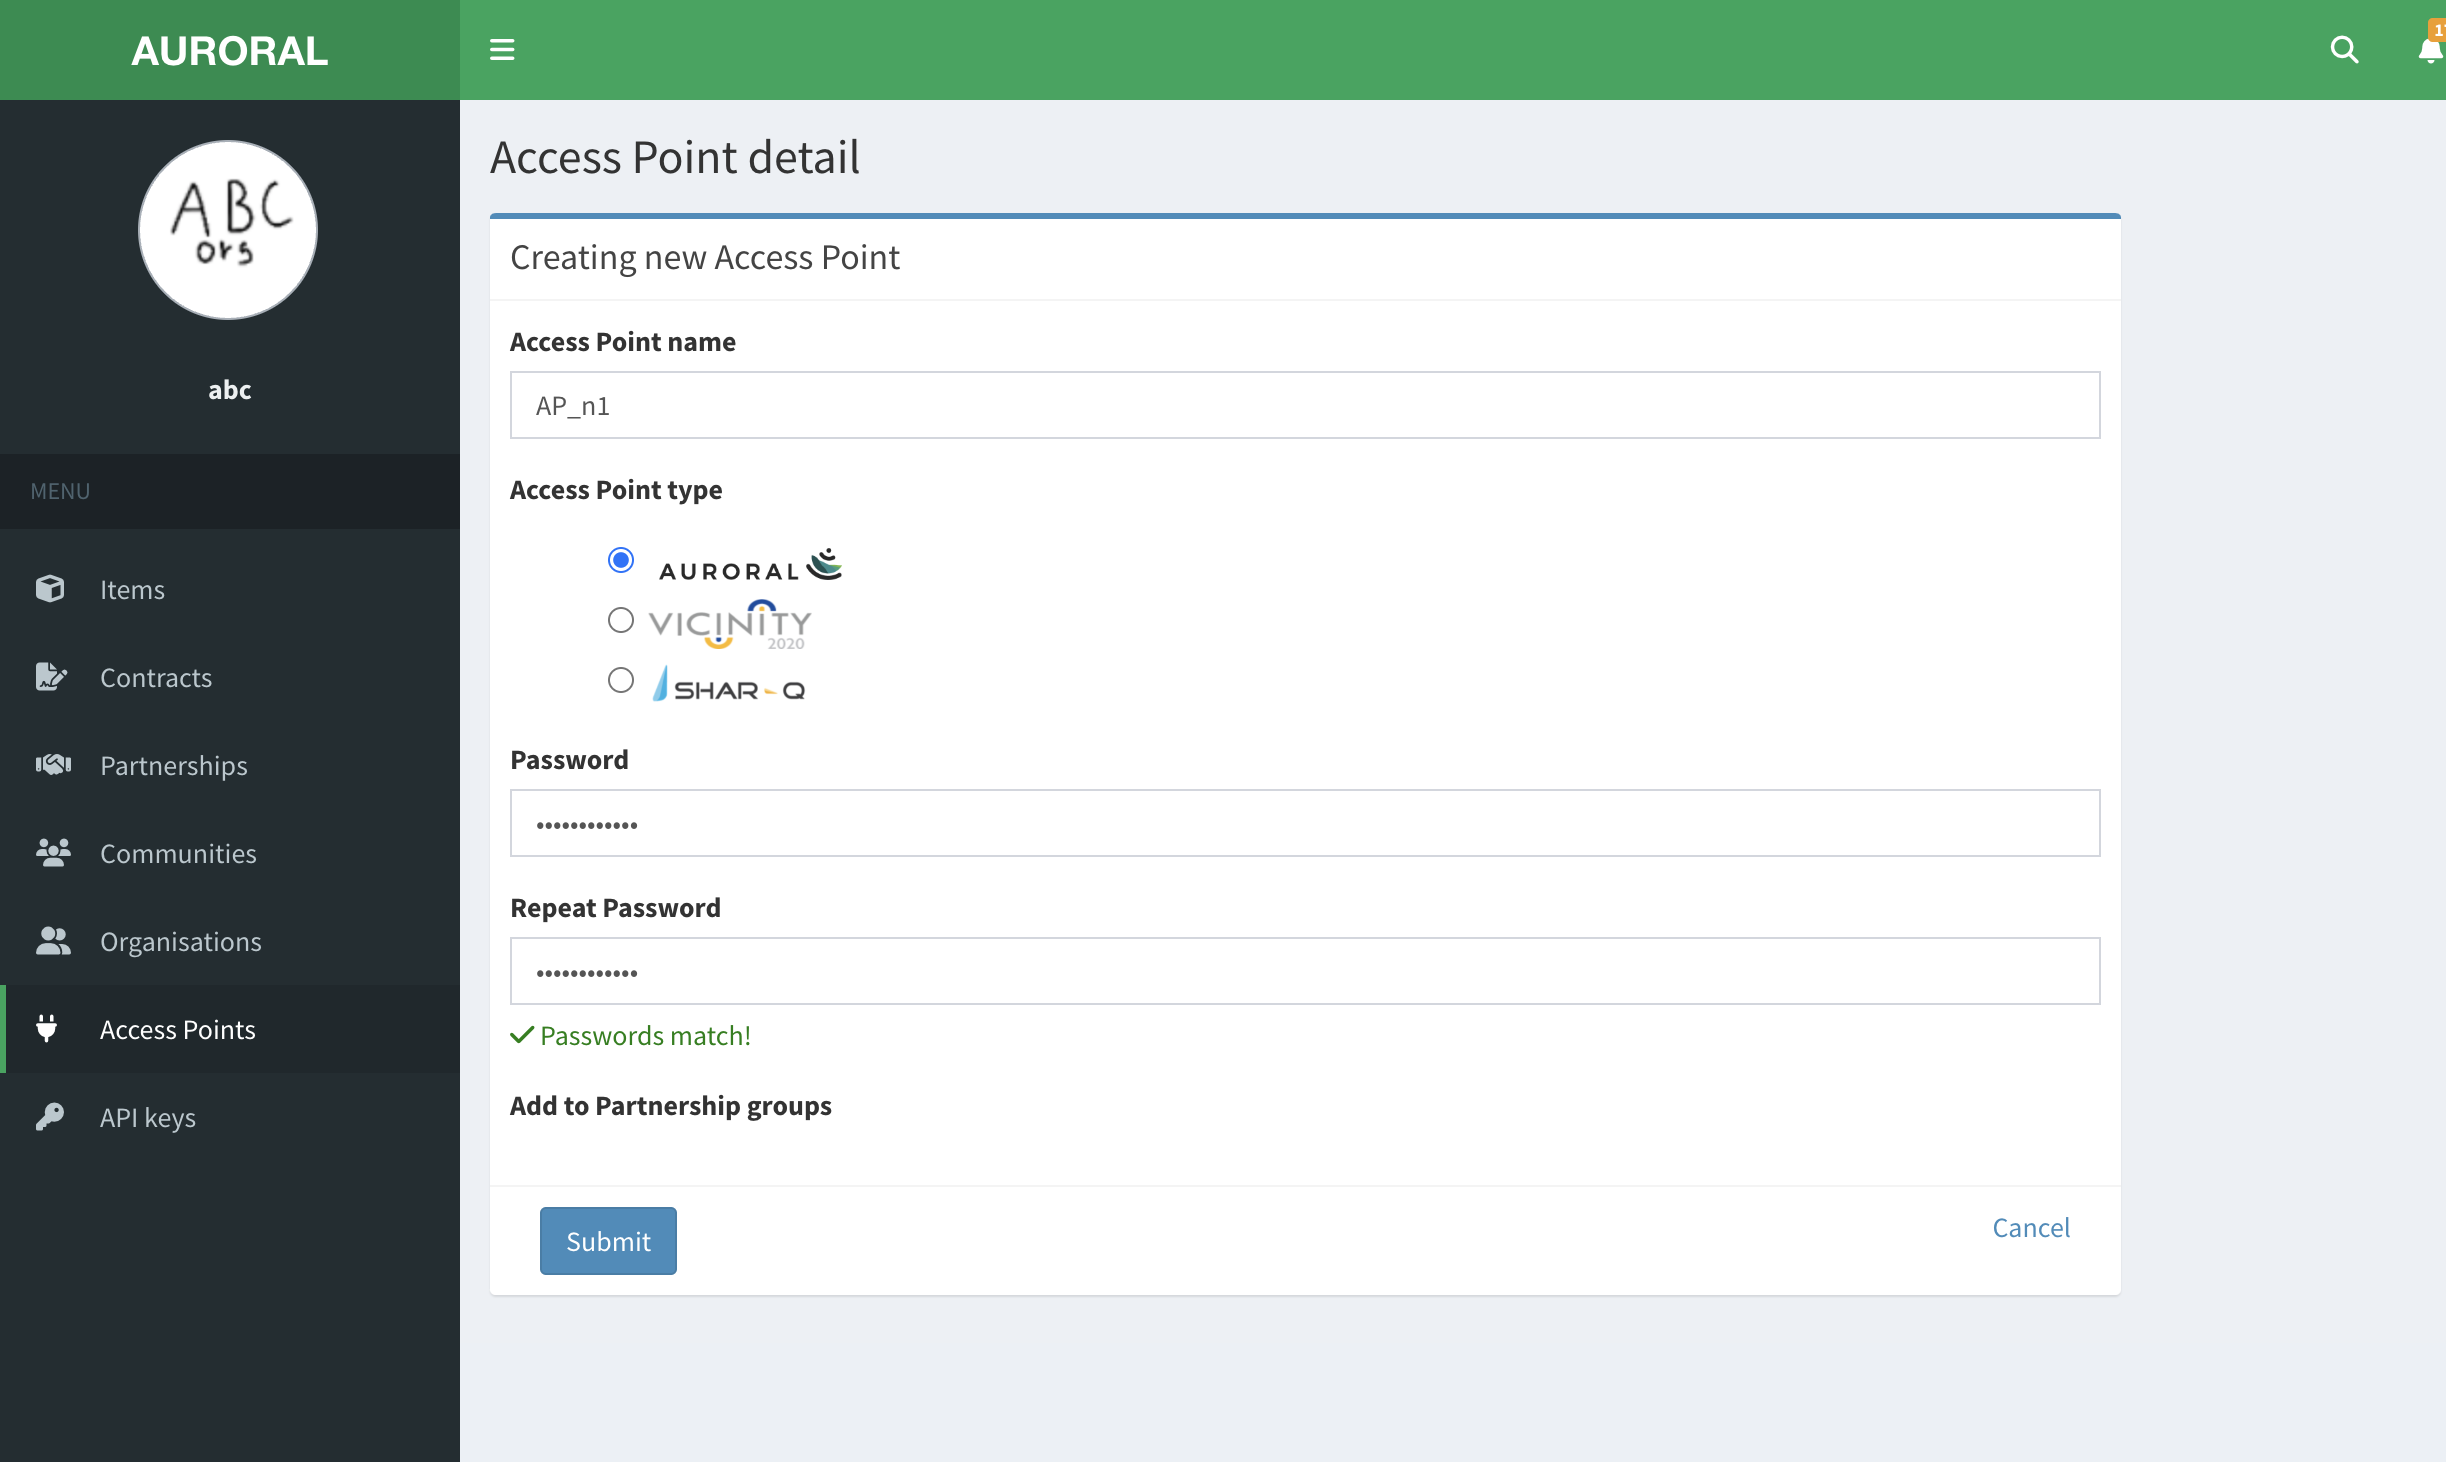
Tip: Remember the password!
Remember the password. It will be used in node installation procedure later on.
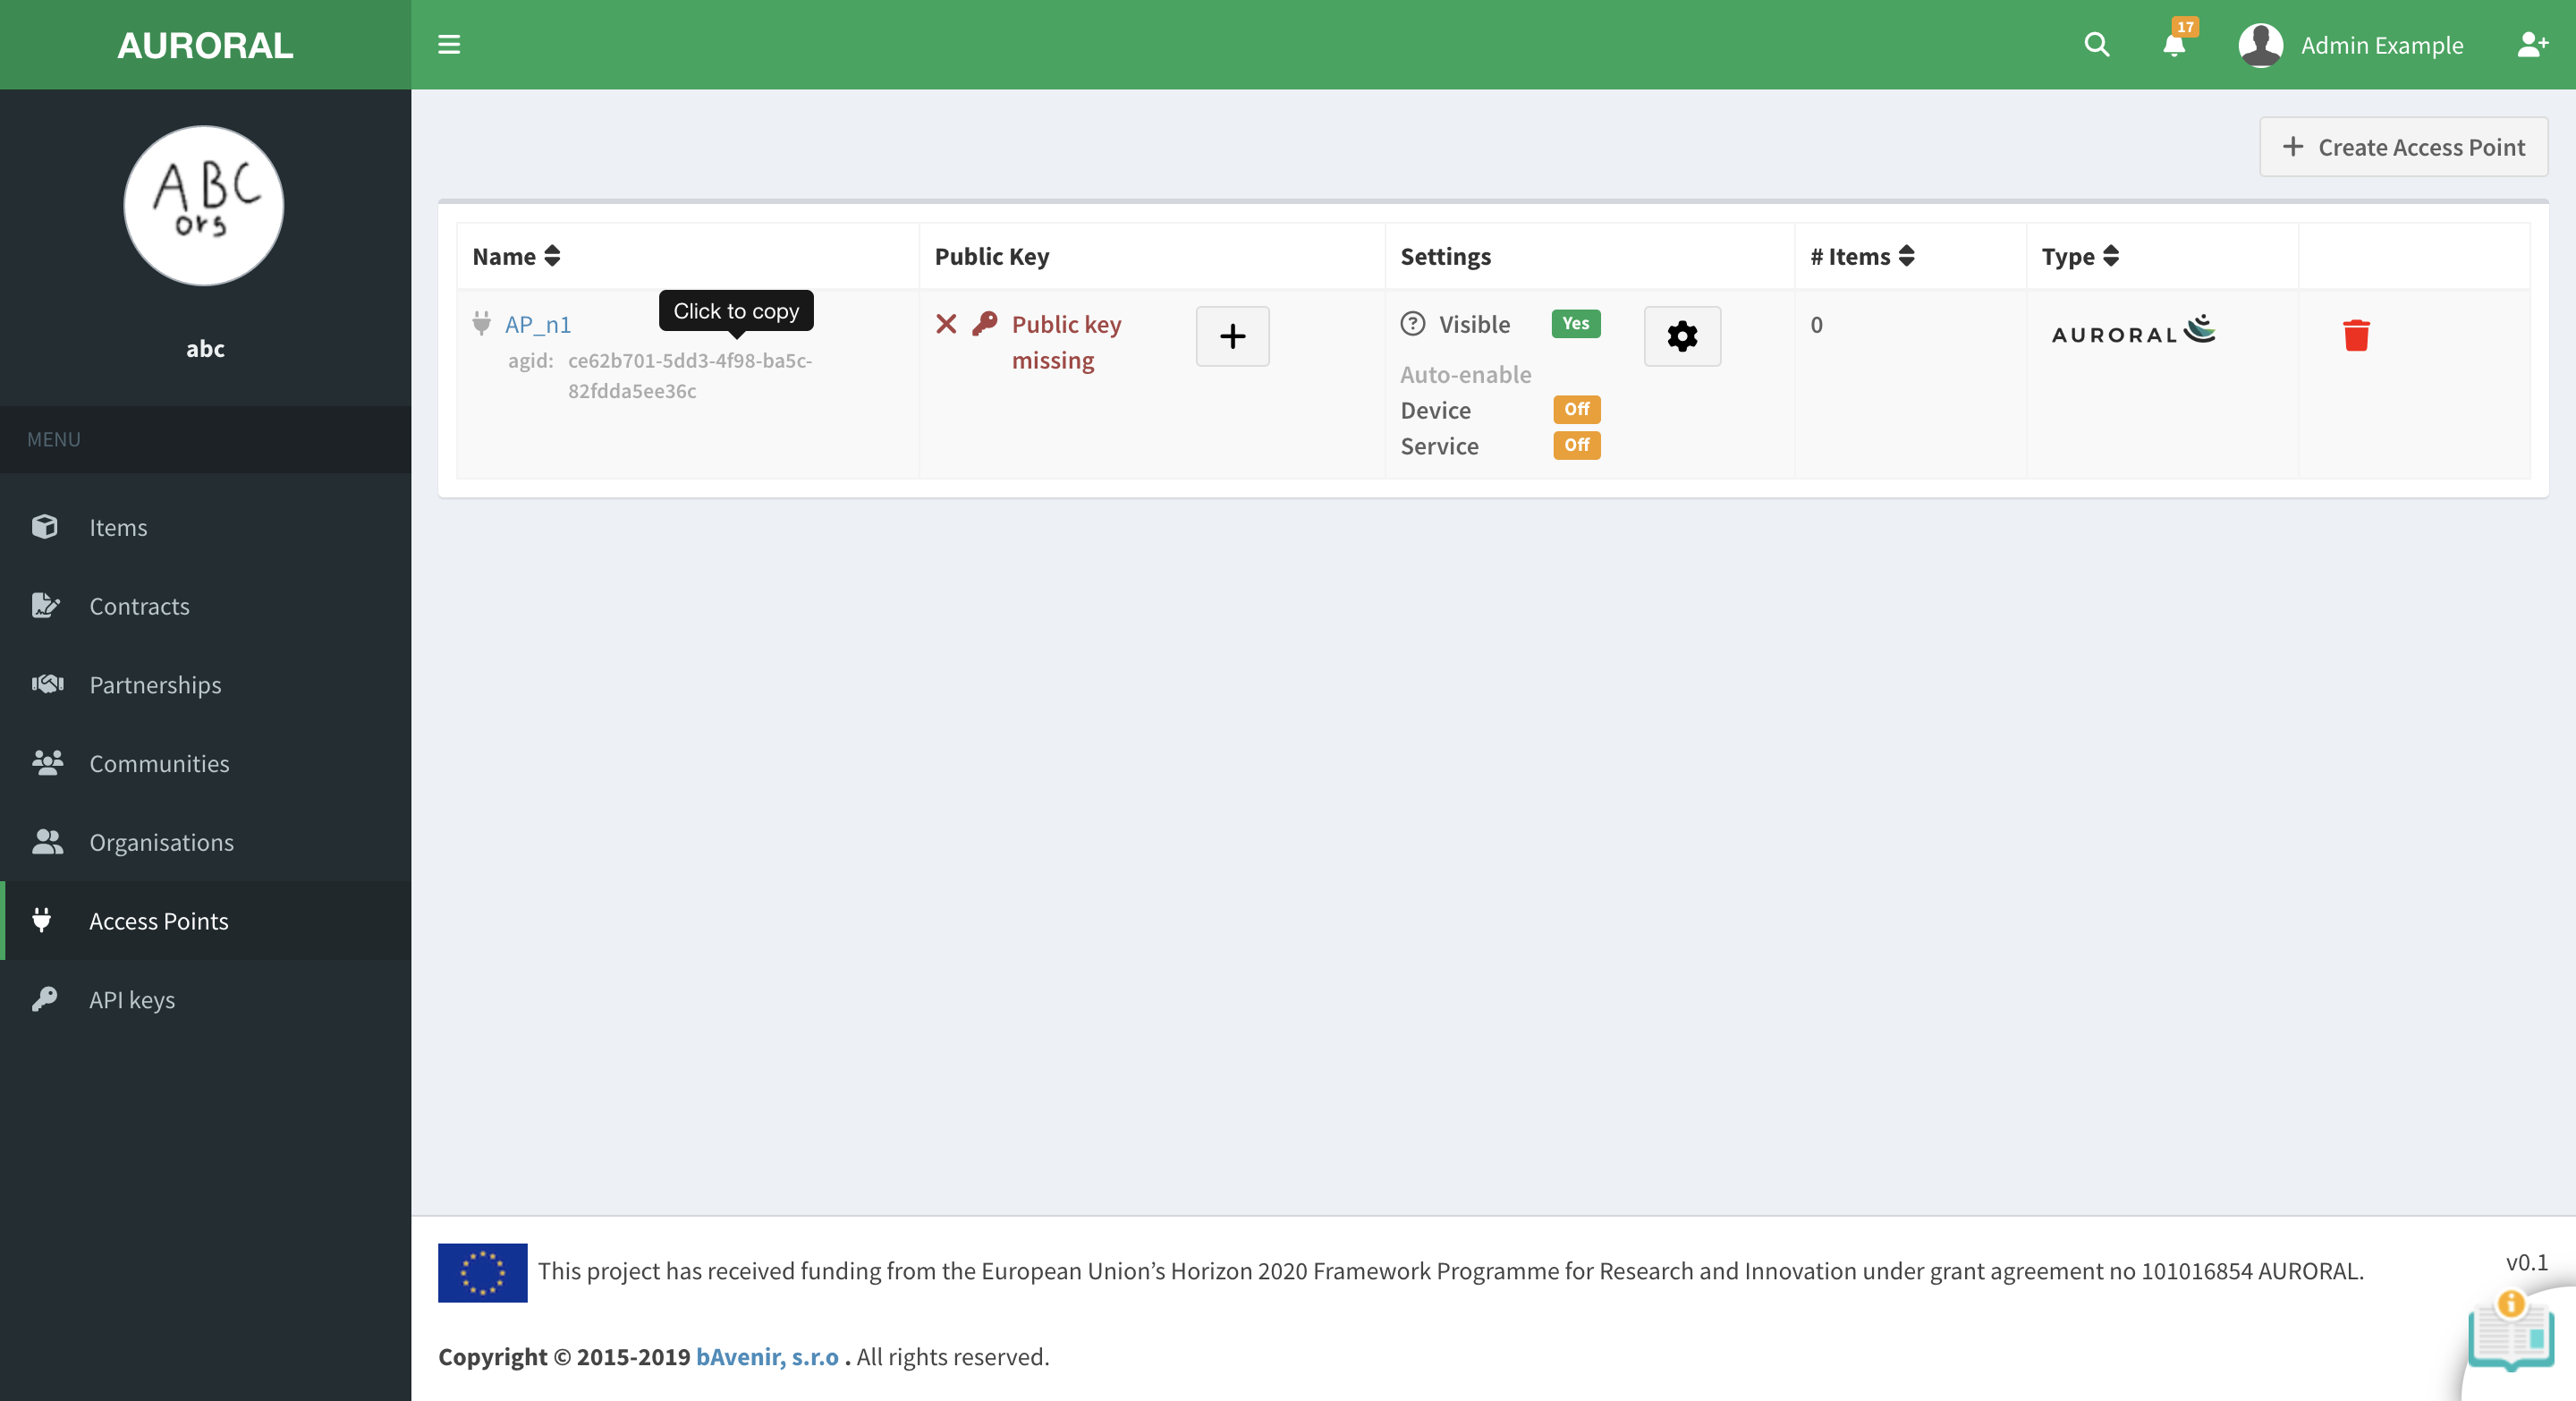
After the Access Point has been created, plase save the AGID, a unique identifier, some place safe. You can leave the browser open for now. You will have to add a public_key to your new Aaccess Point after installing the Node in your infrastructure later on:
Now that you have registered new Acces Point into Auroral platform, you can use it to setup a connection between your Node and the Platform. You have everything ready to install your first Auroral Node.
Install a Node
First you will need to clone or download latest Node repository from GitHub by running:
git clone https://github.com/AuroralH2020/auroral-node.git
curl https://github.com/AuroralH2020/auroral-node/archive/refs/heads/master.zip -L -o auroral-node.zip &&
unzip auroral-node.zip &&
mv auroral-node-master auroral-node &&
rm auroral-node.zip
After you have Node on your target machine, you need to cd into the directory to run node_cli.sh installation script:
cd ./auroral-node &&
./node_cli.sh
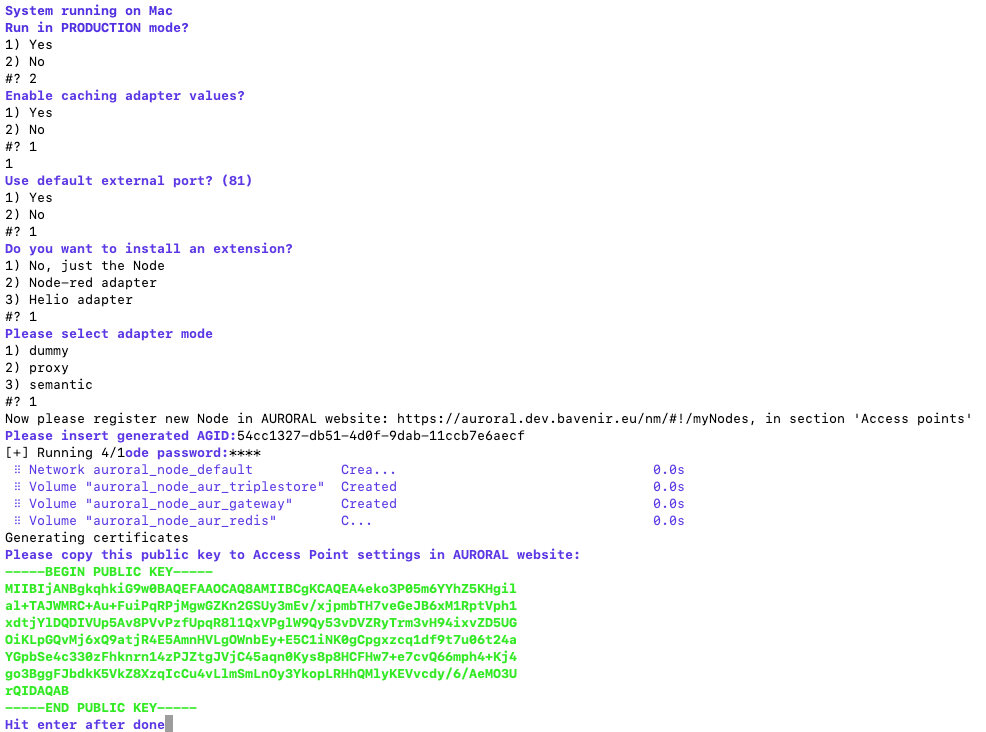
You will be asked with series of questions to help you setup the Node. If you are unclear what type of extensions you want to be runnig, you can just use the dummy mode for now to test the Platform. To do so please type the following answers to run a node with no extensions:
| Question | Answers |
|---|---|
1. Run in production mode? |
1 - Yes 2 - No |
2. Use default external port 81? |
1 - Yes 2 - No |
3. Do you want to install an extension? |
1 - No, just the Node 2 - Node-red adapter 3 - Helio adapter |
4. Please select adapter mode |
1 - dummy 2 - proxy 3 - semantic |
5. Please insert generated AGID: |
Paste the AGID copied when generating Access Point |
6. Please insert Node password: |
Type the password created when generating Access Point |
Tip: Port managment
For your first Node, you should use the default port 81. If you plan to install more, any new one should be running in a different port (i.e. 82, 83, ...)
Extensions and adapters
The extensions are Auroral developed adapters and plugins that might be added when installing the Node. Some popular extensions are the Node-Red and semantic adapters. If you choose one of the extensions when installing the Node, the adapter mode will be configured for you according to what is best for the selected extension. New extensions will be included with next Node releases. For more information about the adapters please refer to Adapters section
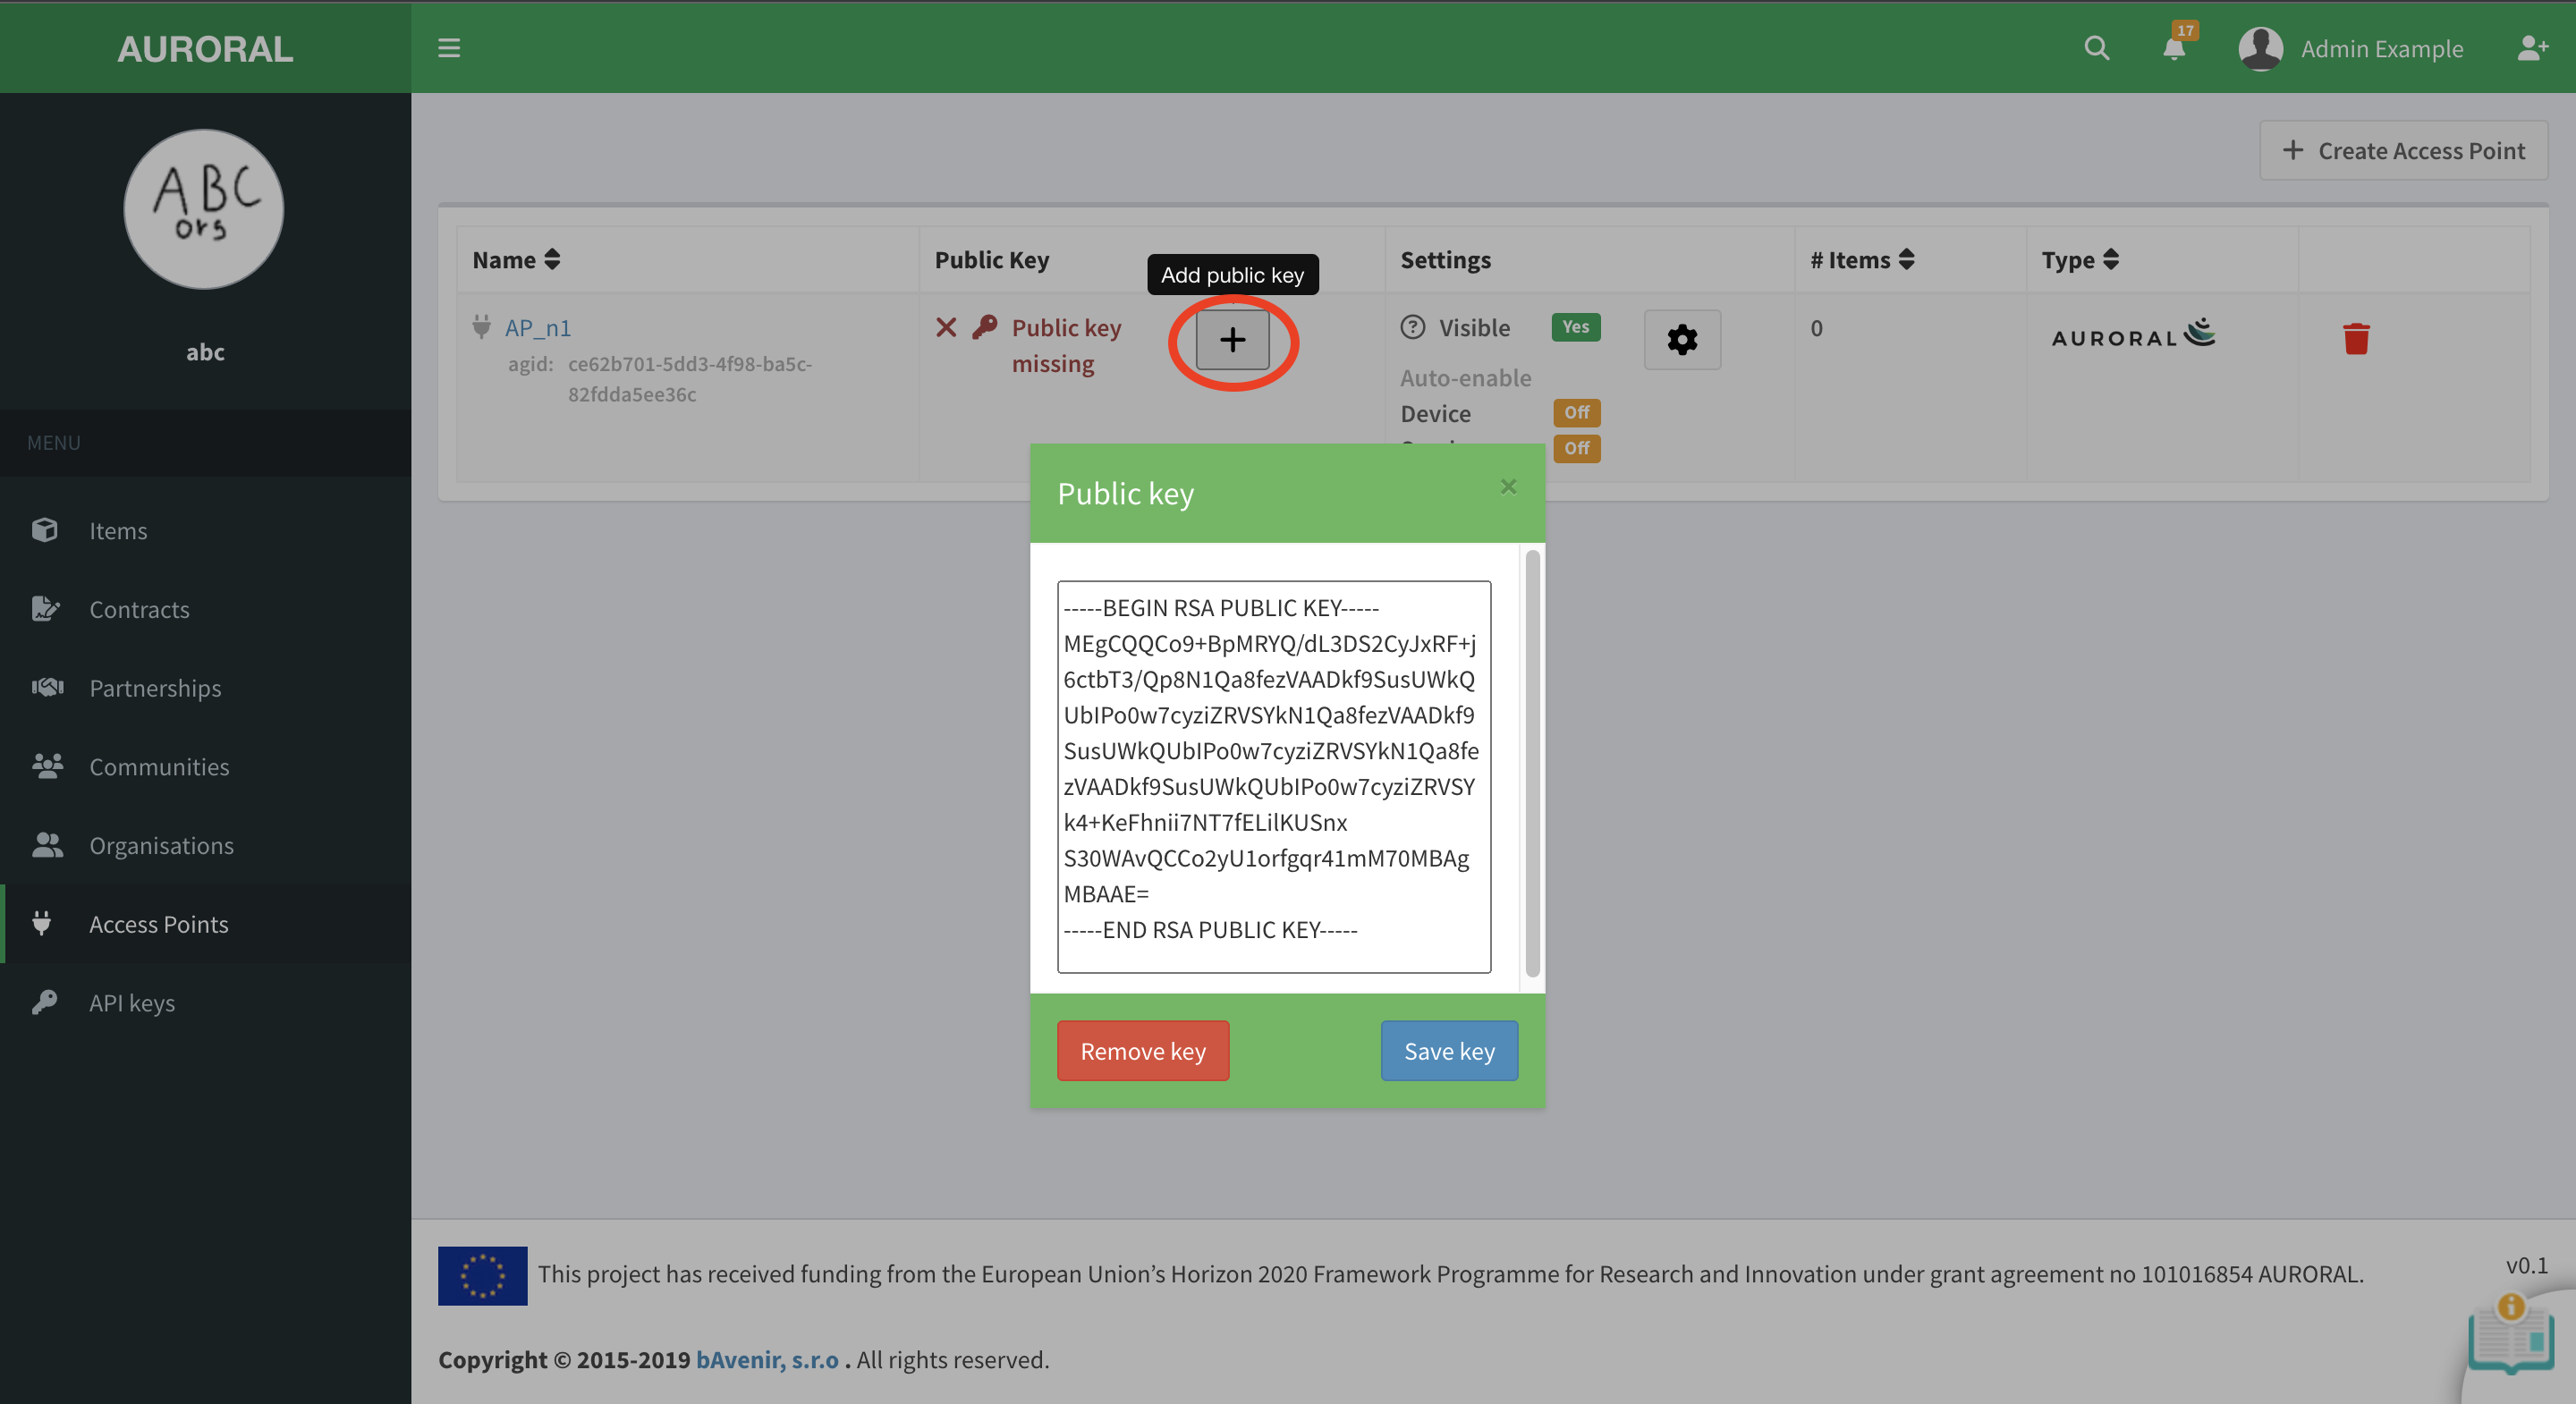
Your encryption keys are now generated and you can copy the public_key shown in the terminal. If everything goes well you should see following result:
How to copy the public_key?
When copying the public_key, you need to include
-----BEGIN PUBLIC KEY----- opening tag and
-----END PUBLIC KEY----- closing tag.
Last thing you need to do before you can start unsing the Node is to passs the public_key to your Access Point. Do do so you you have to:
- open the Auroral NM Aceess Point page
- click the
+add public key button next to your Access Point pastethepublic_keyin the dialog and pressSave keybutton:
Start the Node
To start the Node you need to use Docker to run Auroral Node Container. To do so run this command in Node's directory where the docker-compose.yml file is located:
docker compose up
docker-compose up
Docker
In order to use Docker the docker deamon needs to by running. If you need more information on how to start the deamon, please reffer to official Docker documentation.
Test the Node
In order to test if your Node is running, you can try bellow command:
curl -s -o /dev/null -w "%{http_code}\n" http://localhost:81/api/agent/info
if everything is OK you should see the 200 in the response.
DONE 👍 you are now ready to start using the Auroral Node.
Secure your Node
The Node can run privately, but if you expose its APIs online, secure them with SSL and Basic Authentication. See Setup SSL and Basic Auth for more details.