Integrating data
Data provider
To depict this usecase we will imagine that we want to integrate data produced for some sensors and make it available in AURORAL. Therefore, this example assumes that you have some devices that are producing data constantly.
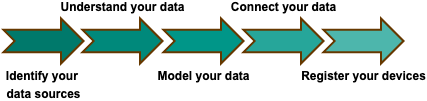
This are the steps to be followed:
-
Identify your data sources: Find which devices you would like to integrate. Then make sure that you are able to access to the data they produce.
-
Understand your data: Have a look at a snapshot of your data. Decide if you want to use it all or part of it and try to identify relevant information about it such as type (number/string), units of measurement, properties (temperature, humidity,...), etc.
-
Model your data: Here AURORAL can help you. In order to make your data interoperable you need to model it in RDF. Wait, what?? AURORAL offers a series of ontologies that can be used to model and add context to various types of data. Here you can find the list of AURORAL ontologies.
-
Connect your data: Now we have the data and we know how to model it, how can I connect it to AURORAL. For that we have the concept of the adapter. There are some readily available to use, however you can also build your own. See the adapters section for more info. The general purpose of an adapter is to bridge your data and AURORAL, so it will have to (1) be able to access your data, (2) map the data to the selected ontology and (3) be accessible to the AURORAL Node.
-
Register your devices: Finally, you need to tell AURORAL where to find your data. For this purpose you will have to register your devices using the AURORAL Node. The registration is perform with a type of document called Thing Description, in it you describe your device main and info and the URIs for accessing the data that your adapter is making available.
Example
For demostration purposes we will use the following example. We have a small office with a sensor that is measuring several parameters. We want to make this data available in AURORAL so that we can use it in our applications.
Identify your data sources
Our demonstrative office is equipped with a sensor from Netatmo called Smart Indoor Air Quality Monitor. This device is able to measure temperature, humidity, CO2, noise and air quality index. The device is connected to the internet and it is possible to access the data it produces through a REST API from Netatmo cloud.
Netatmo API
The Netatmo cloud has several APIs that are well described in their documentation. In this example we are retrieving data from their Aircare API.
Understand your data
After reading Netatmo documentation and generating some tokens, we are able to retrieve the data from the device. The data is provided in JSON format and it looks like this:
{
    "body": {
        "devices": [
            {
                "dashboard_data": {
                    "AbsolutePressure": 1016.5,
                    "CO2": 760,
                    "Humidity": 51,
                    "Noise": 42,
                    "Pressure": 1016.5,
                    "Temperature": 22.5,
                    "time_utc": 1600000000
                },
                "data_type": [
                    "Temperature",
                    "CO2",
                    "Humidity",
                    "Noise",
                    "Pressure",
                    "AbsolutePressure"
                ],
                "date_setup": 1600000000,
                "firmware": 1600000000,
                "last_status_store": 1600000000,
                "last_upgrade": 1600000000,
                "module_name": "Indoor",
                "place": {
                    "altitude": 0,
                    "city": "Madrid",
                    "country": "ES",
                    "timezone": "Europe/Madrid",
                    "location": [
                        30.89600807058707,
                        29.94281464724796
                    ]
                },
                "station_name": "Office",
                "type": "NAMain",
                "wifi_status": 0
            }
        ]
    },
    "status": "ok",
    "time_exec": 0.00000000
}
The ammount of data is not big, but it is enough to demonstrate how to integrate it to AURORAL. We can see that the data is organized in a JSON object with several fields. For our usecase we are interested in the following fields: temperature, humidity, co2, noise and pressure. Here is a table with the data types and units of measurement extracted from the documentation:
| Field | Type | Unit |
|---|---|---|
| temperature | float | °C |
| CO2 | float | ppm |
| humidity | float | % |
| noise | float | dB |
| pressure | float | mbar |
And here are some other information we can extract from the data when we look at the response:
- all the properties above are sensor data
- Netatmo device measuring the temperature is located indoor
- measuring is done in a intervals and we can extract the timestemp when the measuring occurred
Model your data
Now that we know what data we have, we need to model it in RDF. For this purpose we will check the AURORAL ontologies and start looking for best match for our properties: Temperature, CO2, Humidity, Noise, Pressure.
In this case the best match is the AURORAL Adapters ontology. It contains best match for all our properties.
What if one or more of my properties are missing from the ontologies?
Sometimes there is no matching ontology for some of the properies you are trying to describe. This properties then need to be excluded from the final response since they can not be described in RDF format.
Let's start modeling. First we will have to import the ontology. We do this using @context keyword which is an array. This will import all the keywords from AURORAL Adapters ontology:
{
  "@context": [
    "https://auroralh2020.github.io/auroral-ontology-contexts/adapters/context.json"
  ]
}
Importing multiple ontologies
First import is default so you do not need to use any unique_key to reference the keywords from that ontology. But for any other import it is mandatory to distinguish the imports. For example if we want to import Units of measure ontology made by ©eFoodLab you do it like this:
{
  "@context": [
    "https://auroralh2020.github.io/auroral-ontology-contexts/adapters/context.json", // default
    {
      "om": "http://www.ontology-of-units-of-measure.org/resource/om-2/"
    }
  ]
}
om: like this:
{
  "@context": [...]
  ...,
  {
    ...
    "property": "AmbientTemperature", // <- keyword from default ontology
    "isMeasuredIn": "om:degree_Celsius", // <- keyword from non-default ontology
    ...
  },
...
}
Now that we have keywords for our properties we also want to have a keywords for the units of measurement: °C, %, ppm, dB, mbar.
Good ontology for units is Units of measure made by ©eFoodLab. This will import all keywords from that ontology:
{
  "@context": [
    "https://auroralh2020.github.io/auroral-ontology-contexts/adapters/context.json",
    {
      "om": "http://www.ontology-of-units-of-measure.org/resource/om-2/"
    }
  ]
}
Perfect. Now to wrap up our imports we still need one thing. In the Auroral platform items communicate using special identifiers which are:
- object identifier:
oid - interaction identifier:
iid
We need to define those in our RDF so we can connect the device to the platform but they are not part of Auroral ontologies. We can hovever define them using W3 ontology. This will allow us to use label keyword which is what we can use to define the identifiers.
To define oid and iid in our RDF we will first import the rdfs ontology and then add them to our @context:
{
  "@context": [
    "https://auroralh2020.github.io/auroral-ontology-contexts/adapters/context.json",
    ...,
    // import W3 ontology:
    {
     "rdfs": "http://www.w3.org/2000/01/rdf-schema#"
    },
    // define oid and iid keywords:
    {
      "oid": {
        "@id": "rdfs:label"
      },
      "iid": {
        "@id": "rdfs:label"
      }
    }
  ]
}
We are finnaly ready to start defining our properties. Let's start with Temperature. Based on the understanding of our data and the imported ontologies we can model the property like this:
{
  "property": "IndoorAmbientTemperature",
  "value": 22.5,                          // <- value provided by the sensor
  "isMeasuredIn": "om:degree_Celsius",
  "timestamp": "2023-02-28T09:18:09.610Z" // <- timestemp provided by the sensor
}
Now we need to put everything together to get the final result.
The oid will be generated later in the next step by the Node, when you register the device. As for the iid you will have to come up with some unique string. This string will be used in the next step as a key for your property in Thing Description. For this property we will use a string temperature:
// Temperature:
{
  "@context": [
    "https://auroralh2020.github.io/auroral-ontology-contexts/adapters/context.json",
    {
      "om": "http://www.ontology-of-units-of-measure.org/resource/om-2/"
    },
    {
      "oid": {
        "@id": "rdfs:label"
      },
      "iid": {
        "@id": "rdfs:label"
      }
    }
  ],
  "@type": "Sensor",
  "oid": "",            // <- generated in the next step (registration)
  "iid": "temperature", // <- choosen by you (unique!)
  "measurement": [
    {
      "property": "IndoorAmbientTemperature",
      "value": 22.5,
      "isMeasuredIn": "om:degree_Celsius",
      "timestamp": "2023-02-28T09:18:09.610Z"
    }
  ]
}
Now we need to model the response for the rest of the properties. Process is the same like modeling the Temperature. You just need to choose the right property from the ontology and add the value and the unit of measurement:
// CO2:
{
  "@context": [
    "https://auroralh2020.github.io/auroral-ontology-contexts/adapters/context.json",
    {
      "om": "http://www.ontology-of-units-of-measure.org/resource/om-2/"
    },
    {
      "oid": {
        "@id": "rdfs:label"
      },
      "iid": {
        "@id": "rdfs:label"
      }
    }
  ],
  "@type": "Sensor",
  "oid": "",
  "iid": "co2",
  "measurement": [
    {
      "property": "CO2Concentration",
      "value": 760,
      "isMeasuredIn": "om:ppm",
      "timestamp": "2023-02-28T09:18:09.610Z"
    }
  ]
}
// Humidity:
{
  "@context": [
    "https://auroralh2020.github.io/auroral-ontology-contexts/adapters/context.json",
    {
      "om": "http://www.ontology-of-units-of-measure.org/resource/om-2/"
    },
    {
      "oid": {
        "@id": "rdfs:label"
      },
      "iid": {
        "@id": "rdfs:label"
      }
    }
  ],
  "@type": "Sensor",
  "oid": "",
  "iid": "humidity",
  "measurement": [
    {
      "property": "RelativeHumidity",
      "value": 51,
      "isMeasuredIn": "om:percentage",
      "timestamp": "2023-02-28T09:18:09.610Z"
    }
  ]
}
// Noise:
{
  "@context": [
    "https://auroralh2020.github.io/auroral-ontology-contexts/adapters/context.json",
    {
      "om": "http://www.ontology-of-units-of-measure.org/resource/om-2/"
    },
    {
      "oid": {
        "@id": "rdfs:label"
      },
      "iid": {
        "@id": "rdfs:label"
      }
    }
  ],
  "@type": "Sensor",
  "oid": "",
  "iid": "noise",
  "measurement": [
    {
      "property": "Noise",
      "value": 42,
      "isMeasuredIn": "http://www.ontology-of-units-of-measure.org/resource/om-2/decibel",
      "timestamp": "2023-02-28T09:18:09.610Z"
    }
  ]
}
// Pressure:
{
  "@context": [
    "https://auroralh2020.github.io/auroral-ontology-contexts/adapters/context.json",
    {
      "om": "http://www.ontology-of-units-of-measure.org/resource/om-2/"
    },
    {
      "oid": {
        "@id": "rdfs:label"
      },
      "iid": {
        "@id": "rdfs:label"
      }
    }
  ],
  "@type": "Sensor",
  "oid": "",
  "iid": "pressure",
  "measurement": [
    {
      "property": "AtmosphoricPressure",
      "value": 1016.5,
      "isMeasuredIn": "om:mbar",
      "timestamp": "2023-02-28T09:18:09.610Z"
    }
  ]
}
Tip: Using node-red adapter to model your data
Auroral NODE in node-red adapter mode can help you to model your data. It will automatically generate RDF model to data requests based on item's TD. This feature supports only basic data types, but it can be a good starting point for your data modeling. This feature can be disabled in the configuration file by setting use_mapping to false.
Connecting your data and Registering devices
To connect your data to AURORAL you will have to make the respose, modeled in the previous step, accessible and tell the Node where to GET it. This will ensure that every time someone wants to access or discover your data in the AURORAL, the platform knows where to look for it and understands the context of the data.
To do so you create a module that will take care of generating the respose and populating the proper fields with the data. In AURORAL this modules are called the Adapters. There are multiple existing generic Adapters that can be used to automate this process. For this example we will be using one of them called the Node-RED adapter.
Adapters
Generic adapters like Node-red are good way to simplify the process of connecting and registering the item. Even though they can be used to register almost any item, the disadvantage of using the generic adapters is that they usualy put an overhead cost for your system resources. To avoid this you can build your custom adapter that will handle the RDF modeling and data populating. To find out more about the Adapters please reffer to Adapters section.
If your modeled data is part of Auroral Adapters ontology you can use Node red adapter. It can take care of modeling the data and make it available and accessible for you. When using this adapter the steps connecting data and registering devices are tight together.
Nore red adapter only works with Auroral Adapters ontology!
To use this adapter you will have to provide the Thing Description of the item you want to register and it will handle the rest.
Thing description
Thing description is an JSON-LD description of the item that the AURORAL platform understands. For more information about the Thing description please reffer to Item - Thing description section.
Below is the Thing description for our Netatmo data source. To find out step-by-step tutorial how to generate this example please visit here:
{
  "@context": [
    "https://www.w3.org/2019/wot/td/v1",
    {
     "adp": "https://auroral.iot.linkeddata.es/def/adapters#",
     "om": "http://www.ontology-of-units-of-measure.org/resource/om-2/",
     "geo": "http://www.w3.org/2003/01/geo/wgs84_pos#"
    }
  ],
  "security": [
    "nosec_sc"
  ],
  "securityDefinitions": {
    "nosec_sc": {
      "scheme": "nosec"
    }
  },
  "geo:location": {
        "geo:lat": "30.89600807058707",
        "geo:long": "29.94281464724796"
  },
  "title": "OfficeSensor",
  "adapterId": "my-office-sensor1",
  "@type": "adp:Sensor",
  "description": "Netatmo indoor sensor",
  "properties": {
    "temperature": {
      "title": "temperature",
      "description": "Temperature in the room",
      "@type": "adp:AmbientTemperature",
      "unit": "om:degree_Celsius",
      "readOnly": true,
      "type": "number",
      "forms": [
        {
          "op": "readproperty",
          "href": "" // <-- Will be populated by the adapter
        }
      ]
    },
    "humidity": {
      "title": "humidity",
      "description": "Humidity in the room",
      "@type": "adp:RelativeHumidity",
      "unit": "om:degree_Celsius",
      "readOnly": true,
      "type": "number",
      "forms": [
        {
          "op": "readproperty",
          "href": "" // <-- Will be populated by the adapter
        }
      ]
    },
    "co2": {
      "title": "co2",
      "description": "CO2 in the room",
      "@type": "adp:CO2",
      "unit": "om:percentage",
      "readOnly": true,
      "type": "number",
      "forms": [
        {
          "op": "readproperty",
          "href": "" // <-- Will be populated by the adapter
        }
      ]
    },
    "noise": {
      "title": "noise",
      "description": "Noise in the room",
      "@type": "adp:Noise",
      "unit": "http://www.ontology-of-units-of-measure.org/resource/om-2/decibel",
      "readOnly": true,
      "type": "number",
      "forms": [
        {
          "op": "readproperty",
          "href": "" // <-- Will be populated by the adapter
        }
      ]
    },
    "pressure": {
      "title": "pressure",
      "description": "Pressure in the room",
      "@type": "adp:AtmosphoricPressure",
      "unit": "om:mbar",
      "readOnly": true,
      "type": "number",
      "forms": [
        {
          "op": "readproperty",
          "href": "" // <-- Will be populated by the adapter
        }
      ]
    }
  }
}
Note that besides the properties, we also added some metadata to the Thing description, such as location and adapterId. As for the forms array field, this is where all the enpoints (in our case only one endpoint) for accessing the data should go. Since we are using the Node-red adapter, we can leave the href field empty because the adapter will take care of populating this field.
Now when we have our data source described in a Thing description, we can register it in AURORAL. To do this we expect your Node is installed with Node-red extension and is running.
How to install the Node-red extension?
When you are insatlling new Node, you have an option to install Node-red extension. To find out how to do this please reffer to our Getting started - install a Node section.
Our Node-red flow is available in Node-red-examples repository, where are also described all the requirements and instructions how to run it. Bellow is the example how the flow for our Netatmo use-case should look like in Node-red:
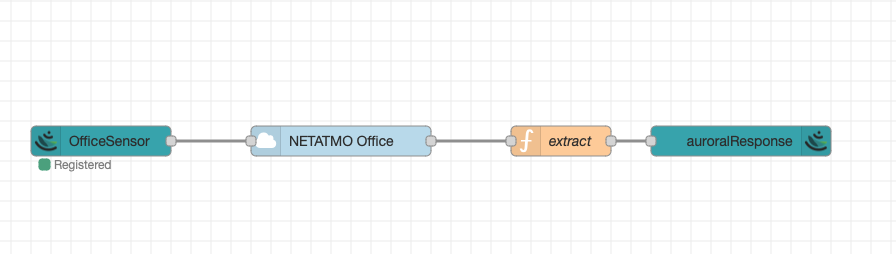
Because this adapter is doing registration of devices automatically, we don't need to do anything else. After a while we can see that our device is registered and after enabling it can be used in AURORAL.
Do not see the device?
Maybe you forgot to enable the device. If you don't enable device, it will not be visible in AURORAL. More about enabling devices can be found here.